Folding cartons
Carton with snap-lock bottom
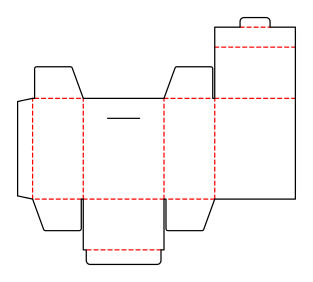
Folding carton with a top tuck flap and a snap-lock bottom (“1-2-3 bottom”) made of four interlocking flaps, without bottom gluing.
Opens the online editor with this template. Try it without payment details; export with Pro.
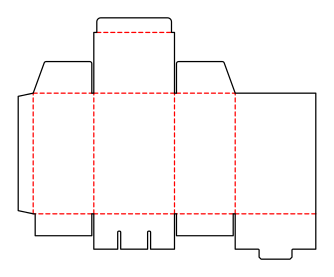
- Template
- Carton with snap-lock bottom
- Category
- Folding cartons
- Dimension reference
- Inside dimensions
- Default dimensions
- 80 × 60 × 120 mm
- Parameters
- 10
- Version
- v1
- Template ID
- carton.snaplock
Dimensions and limits
Default dimensions of the template and the permitted range in mm.
| Dimension | Default | Range |
|---|---|---|
| Length | 80 mm | 30–200 mm |
| Width | 60 mm | 30–200 mm |
| Height | 120 mm | 30–200 mm |
Parameters of this construction
10 parameters with default value and limits, adjustable in the editor.
| Parameter | Default | Range | Note |
|---|---|---|---|
Glue flapglueFlap | 15 mm | 8–25 mm | Width of the glue flap used to glue the blank into a tube. The material requires a minimum width. |
Glue flap angleglueFlapAngle | 12° | 0–20° | Bevel at the ends of the glue flap; facilitates folding and erection. |
Tuck depthtuckDepth | 15 mm | 10–30 mm | How far the tuck flap reaches into the box; at most approximately half the width (the height for the mailer). |
Tuck flap radiustuckRadius | 4 mm | 0–10 mm | Corner radius of the tuck flap; limited by half the flap width or tuck depth. |
Tuck flap shouldertuckShoulder | 3 mm | 2–6 mm | Side inset of the tuck flap relative to the lid, allowing easy insertion. |
Dust flap length (ratio)dustFlapRatio | 80 % | 50–95 % | Dust flap length as a ratio of the available length. |
Dust flap angledustFlapAngle | 20° | 0–45° | Bevel of the dust flaps (also the ears on the mailer); larger angles prevent collisions during folding. |
Bottom flap overlapflapOverlap | 10 mm | 2–40 mm | Overlap of flaps 3 and 4 outside the closure. |
Nose lengthnoseLength | 10 mm | 5–30 mm | Length of the locking tab on flap 4 that engages under the tongue of flap 3. |
Slit widthslitWidthExpert | 3 mm | 2.5–6 mm | Width of the slots or incisions; 0 = blade cut. The machine requires a minimum slot width. |
Assembly
Glue the glue flap and flatten the carton. Erect for filling, fold in side flaps 1 and 2, place flap 3 with the tongue over them, and tuck the tab of flap 4 under the tongue. After filling, fold in the dust flaps and insert the tuck flap.
Grain direction
Grain direction parallel to the height: wall creases lengthwise, bottom and lid creases crosswise; the flaps remain stiff and the tab does not bend out from under the tongue (check with the test print shop).
Reference note
ECMA family, unconfirmed
Labels such as “similar to FEFCO” or “ECMA family, unconfirmed” are for orientation only. The templates are our own constructions; an assignment to a standard code is unconfirmed and not a trademark claim.
Frequently asked questions about this template
In what order do I close the bottom?
Fold the two side flaps inward first, then the front flap with the slits, and finally the tab flap at the back. The tab engages under the tongue; layers change at the slits. Check this sequence on the sample before filling, particularly with thicker board and small inside dimensions.
Is the snap-lock bottom glued?
The bottom flaps interlock without their own adhesive. The side glue flap of the body is still glued to form a tube. This distinguishes the bottom from a preglued crash-lock bottom. You must perform the locking during erection; it does not happen simply by opening the flattened carton.
How much overlap is permitted?
flapOverlap starts at 10 mm and has a range of 2 to 40 mm. The model also limits overlap to 40 % of bottom width. The maximum table value therefore does not fit every inside dimension. Coordinate overlap and tab length together and check the bottom with the target board.
Related templates
Customise the Carton with snap-lock bottom in your browser
Set dimensions and material, review findings and export print-ready as PDF, SVG or DXF.