Folding cartons
Hinged lid carton
Folding carton with a tuck bottom and a hinged lid attached to the back wall; the lid's front wall overlaps the front on the outside, and its tuck flap is inserted through a slot in the front.
Opens the online editor with this template. Try it without payment details; export with Pro.
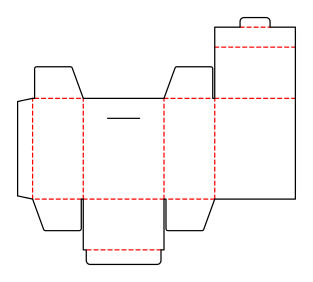
- Template
- Hinged lid carton
- Category
- Folding cartons
- Dimension reference
- Inside dimensions
- Default dimensions
- 80 × 50 × 100 mm
- Parameters
- 25
- Version
- v3
- Template ID
- carton.hinged.lid
Dimensions and limits
Default dimensions of the template and the permitted range in mm.
| Dimension | Default | Range |
|---|---|---|
| Length | 80 mm | 30–200 mm |
| Width | 50 mm | 30–200 mm |
| Height | 100 mm | 30–200 mm |
Parameters of this construction
25 parameters with default value and limits, adjustable in the editor.
| Parameter | Default | Range | Note |
|---|---|---|---|
Glue flapglueFlap | 15 mm | 8–25 mm | Width of the glue flap used to glue the blank into a tube. The material requires a minimum width. |
Glue flap angleglueFlapAngle | 12° | 0–20° | Bevel at the ends of the glue flap; facilitates folding and erection. |
Tuck depthtuckDepth | 15 mm | 10–30 mm | How far the tuck flap reaches into the box; at most approximately half the width (the height for the mailer). |
Tuck flap radiustuckRadius | 4 mm | 0–10 mm | Corner radius of the tuck flap; limited by half the flap width or tuck depth. |
Tuck flap shouldertuckShoulder | 3 mm | 2–6 mm | Side inset of the tuck flap relative to the lid, allowing easy insertion. |
Dust flap length (ratio)dustFlapRatio | 80 % | 50–95 % | Dust flap length as a ratio of the available length. |
Dust flap angledustFlapAngle | 20° | 0–45° | Bevel of the dust flaps (also the ears on the mailer); larger angles prevent collisions during folding. |
Dust flap reliefdustFlapReliefExpert | 2 mm | 1–5 mm | Distance between dust flap and lid along the crease; at least the material thickness. The machine requires a minimum slot width. |
Slit widthslitWidthExpert | 0 mm | 0–3 mm | Width of the slots or incisions; 0 = blade cut. The machine requires a minimum slot width. |
Lid overhanglidOverhang | 20 mm | 10–60 mm | Height of the lid front wall that overlaps the front on the outside; at most half the height. The slot in the front is positioned at this height. |
Lid tuck depthlidTabDepth | 10 mm | 5–25 mm | How far the tuck flap on the lid front wall reaches through the slot into the box; at most half the width. |
Lid tuck widthlidTabWidth | 30 mm | 10–120 mm | Width of the tuck flap on the lid front wall; the slot in the front is 2 mm longer. A shoulder of at least 3 mm remains on each side. |
Hang holehangHole | none | none · euro · round · slot | Hole for hanging on a retail shelf: Euro slot (elongated slot with a round hole above), round hole, or slot. On cartons and the gift card holder, it is centered in a header above the top edge. |
Hole widthhangHoleWidth | 30 mm | 10–60 mm | Width of the elongated slot in the Euro slot and slot options. |
Slot heighthangHoleHeight | 5 mm | 2–10 mm | Height of the elongated slot in the Euro slot and slot options; the ends are semicircular. |
Hole diameterhangHoleDiameter | 10 mm | 3–20 mm | Diameter of the round hole or circle above the elongated slot in the Euro slot; larger than slot height for the Euro slot. |
Header heighthangTabHeight | 25 mm | 15–60 mm | Height of the header above the top edge; the hole sits at its center and maintains at least a 3 mm bridge to all edges. |
Windowwindow | off | on / off | |
Window shapewindowShape | rectangle | rectangle · oval | |
Window widthwindowWidth | 50 mm | 10–400 mm | |
Window heightwindowHeight | 25 mm | 10–400 mm | |
Window corner radiuswindowCornerRadius | 4 mm | 1–20 mm | |
Window position horizontalwindowPositionX | 50 % | 20–80 % | |
Window position verticalwindowPositionY | 50 % | 20–80 % | |
Film marginfilmMargin | 6 mm | 3–12 mm |
Assembly
Pre-break all creases in the blank, glue the glue flap to the inside of the back, and lay the box flat. Erect it for filling and close the bottom with dust flaps and the tuck flap. After filling, fold in the upper dust flaps, close the lid, lay the lid's front wall over the front, and insert the tuck flap into the slot.
Grain direction
Grain direction parallel to height: wall creases along the grain, lid and bottom creases across it; the lid stays stiff and its front wall lies flat against the front (check with a test print shop).
Reference note
ECMA family, unconfirmed
Labels such as “similar to FEFCO” or “ECMA family, unconfirmed” are for orientation only. The templates are our own constructions; an assignment to a standard code is unconfirmed and not a trademark claim.
Frequently asked questions about this template
Where is the hinged lid attached?
A crease connects the lid to the back. When closed, its front wall overlaps the front on the outside. That wall's tuck flap engages through the front slot. The lower tuck closure belongs to a separate bottom structure; it is not part of the rear lid hinge.
How are the overhang and front slot related?
lidOverhang describes the height of the lid's front wall and thus the position of the slot in the front. The overhang must not exceed half the box height. Change it together with flap width and tuck depth. Check on the sample whether the front wall lies flat and the flap engages securely in the slot.
What does zero slot width mean?
The starting value slitWidth=0 means a knife cut. A positive width creates a die-cut slot whose width must match the machine profile. The front slot is 2 mm longer than the lid flap is wide. Confirm suitability of the knife cut for the target board with the print shop and a closure sample.
Where is an optional hanging hole located?
V2 creates the header on the front. It projects through an additional slot in the hinged lid because the hinge occupies the back. This option is disabled in the shown starting example. With hanging enabled, check the header opening, hole shape, and bridges together; this does not provide load-bearing approval.
Related templates
Customise the Hinged lid carton in your browser
Set dimensions and material, review findings and export print-ready as PDF, SVG or DXF.